Create Library Elements
Sooner or later you’ll need to create your own library elements in your local library you have created previously. Open that library now in the libraries panel:

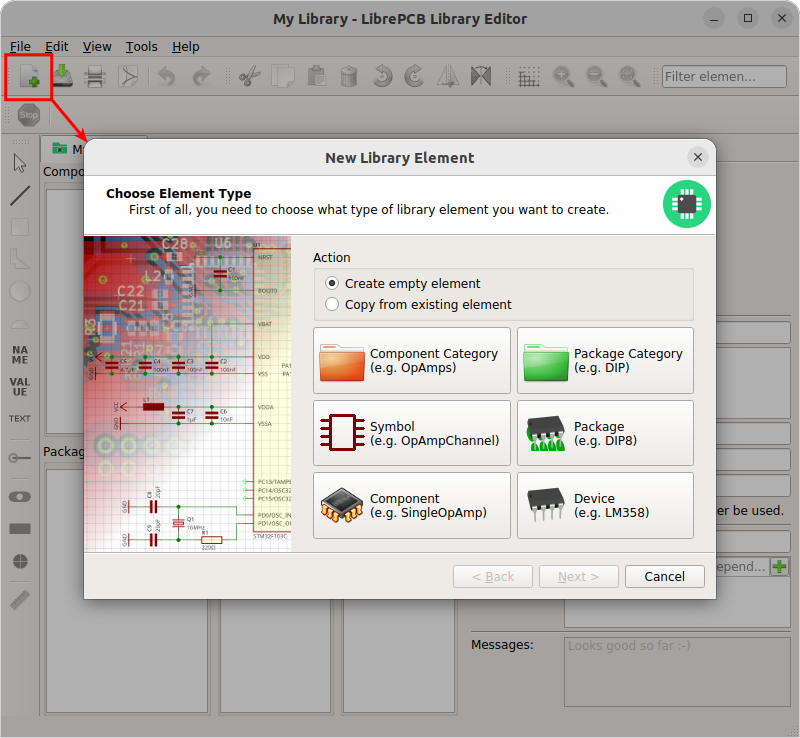
In the library editor, there are six buttons to create the six different kinds of library elements which LibrePCB is based on (no worries, important are only four of them). So every new library element you will create during this tutorial, starts with one of those buttons:
Concept Overview
But first we need a crash course to understand the basics of LibrePCB’s library concept. A library consists of several different elements:
- Component Category
-
These are basically "metadata-only" elements used to categorize the "real" library elements in a category tree. Every symbol, component and device can be assigned to one or more categories to make them browsable in the category tree you used in the schematic editor for adding components/devices. Examples: Resistors. LEDs, Microcontrollers
- Symbol
-
A symbol is the graphical representation of a component (or parts of it) in a schematic. It consists of electrical pins and graphical objects like lines. Examples: European Resistor, LED, 1x10 Connector
- Component
-
A component basically represents a "generic" kind of electrical part. It’s not a real part which you can buy, it’s just theoretical. The component defines the electrical interface of a part and how it is represented in the schematic (by referencing one ore more symbols). But it does not define how the part looks physically on a board. Examples: Resistor, Bipolar Capacitor, 4-channel OpAmp
- Package Category
-
Exactly the same as the component category, but for packages instead of components. This allows to browse packages in a category tree. Examples: Chip Resistors, Axial Capacitors, DIP
- Package
-
As the name suggests, packages represent the mechanical part of a "real" electronic part. It contains the footprint with their electrical pads and graphical objects which is then added to boards. Later a package may also contain a 3D model for the 3D board viewer. Examples: TO220, DIP20, LQFP32
- Device
-
The device now represents a real electronic part which you can buy. It basically combines a component with a package and defines the pinout to connect component signals with package pads. Examples: 0805 Resistor, LM358D, STM32F103C
|
The order of this list is also the order to follow when creating new library elements. For example a device always needs to be created after the corresponding component. The other direction is not possible because of the dependencies. |
No worries if this is a bit too much theory for now. The rest of the tutorial is more practical, which will help you to understand the concept step by step.
Our Example: LMV321LILT
Let’s say you want to create the part LMV321LILT (OpAmp, see datasheet) from A to Z. We will now create all the necessary library elements for the LMV321LILT, though in practice you only need to create the elements which do not exist already. You can even use elements from other libraries, for example the symbol from library X, the component from library Y and the package from library Z.
|
It’s really important to understand how to re-use already existing components and packages. In many cases, your desired component (e.g. Single OpAmp) and package (e.g. SOT23-5) already exist in our libraries. Then the only element you have to create is the device, which just takes a minute. If you want to learn the whole concept, follow the tutorial (recommended). If you only want to create a device, skip the basics and go directly to the device tutorial. |
Here an overview which library elements we’ll create for the LMV321LILT:
-
Component category: Integrated Circuits › Linear › Amplifiers
-
Symbol: Single OpAmp
-
Component: Single OpAmp
-
Package category: SOT
-
Package: SOT23-5
-
Device: LMV321LILT